Detection of Early-Stage Creep Damage in Welded Creep Strength Enhanced Ferritic (CSEF) Steels in Power Plants
By Harendra Kumar, Jack Lambert and Channa Nageswaran
Industrial Need
In order to improve the overall efficiency of thermal power plants, main steam temperature and pressure exceeding 593°C and 24MPa, respectively, are being pursued in so-called ultra-supercritical plants. Components exposed to these conditions require the use of materials that have suitable high-temperature strength, creep properties and a stable microstructure. Alloys considered include austenitic stainless steels and nickel base alloys; these are, however, prohibitively expensive. Ferritic steels with lower chromium content, in particular ASME SA387 Grade 91 (modified 9Cr-1Mo), have instead been selected for fabrication in many plants throughout the world, for their thermal properties and enhanced creep, oxidation and corrosion resistance. Grade 91, which is part of a family termed the creep strength enhanced ferritic (CSEF) steels, may suffer from failure during service in a very specific way, characterised as Type IV creep cracking. This is associated with welding and occurs in the heat affected zones of the welded components operating in the creep regime. Power plants around the world continue to suffer from damage and failure of components due to Type IV damage, so there is a need to detect it in its early-stages.
Creep damage in Cr-Mo ferritic, low-alloy ferritic and CSEF steels is characterised by the formation of voids within the volume of the metal as it creeps at elevated temperatures, above the creep threshold. As the damage evolves, the voids coalesce into cracks. There is a need to detect the damage before it poses a threat to the integrity of the component. The danger of Type IV damage is that it can evolve rapidly during operation. So early-stage damage which remains undetected during an outage inspection can develop into cracks that may lead to failure before the next outage.
Metallurgical replication on the outside surface of components is commonly used to assess creep damage. While this can detect isolated voids, it does not give any information on the condition of the metal beneath the surface. There is evidence that Type IV damage initiates and develops into a crack underneath the surface; therefore an inspection technique to detect subsurface damage is required to complement surface replication. Ultrasonic testing shows promise for providing information on early-stage localised sub-surface damage. This report presents the results of investigations into a number of techniques to detect Type IV creep damage.
Key findings
- Creep test parameters have been optimised to induce Type IV creep damage in cross weld tensile specimens. A set of arc welded and EB welded creep exposed tensile specimen is available with varying extent of creep damage in both HAZs.
- The backscattered amplitude-based ultrasonic imaging technique developed in this project enables detection of early-stage Type IV creep. Its field implementation has the potential to reduce the existing detection threshold, in order to increase confidence in assessment of welded components.
- Optimised test parameters have been identified which produce distinct levels of Type IV creep in ASME Grade 91 steel specimens. However, material behaviour related factors introduce uncertainty in the generation procedures.
- Verification trials using optical microscopy, electron microscopy and microfocus X-ray computed tomography (µCT) confirm the detection of accumulated Type IV creep prior to the formation of any micro-cracks from void coalescence.
- Replication and microscopy of 9-12% Cr steels is not straightforward - it requires a high level of skill and should be practised in accordance with a specific procedure for the material.
- µCT is a volumetric technique that can be utilised as a tool for Type IV creep related failure investigations. However, sample cross-sectional areas should be minimised (e.g. less than 10mm by 10mm) to achieve sufficient resolution for early-stage damage detection.
- The results of this investigation provide good basis for moving forward with industrial validation of this ultrasonic technique.
- The current technique is limited in weld volume coverage as it uses highly focused single crystal probes. Array probes and imaging methods may provide improved coverage provided they are able to transmit sufficient energy into the material.
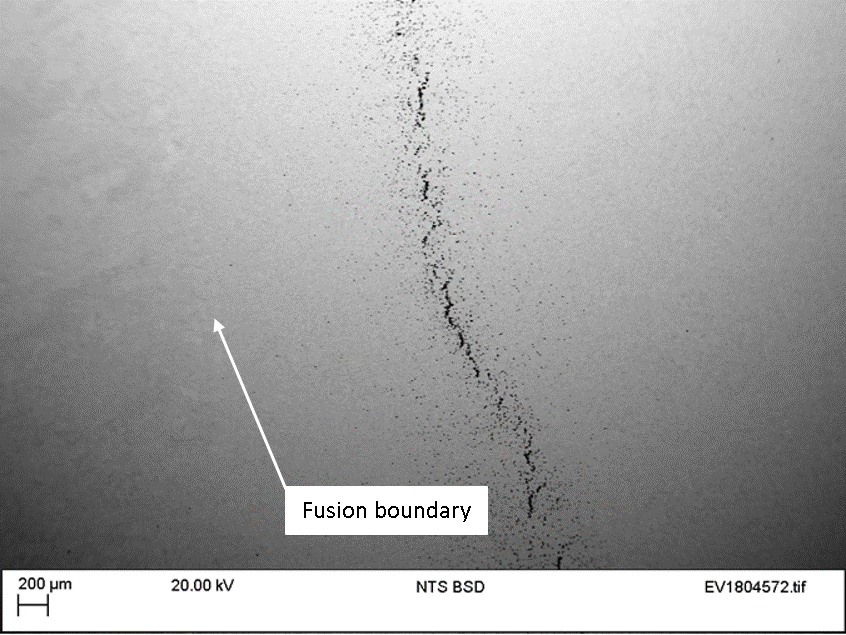
Scanning electron microsope image from intact heat-affected zone of a cross weld creep-failed Gr 91 specimen showing advanced Type IV creep damage with high density of voids

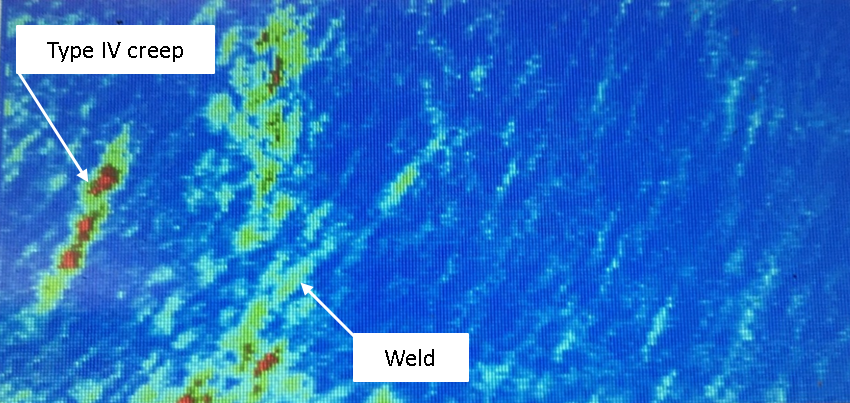
Ultrasonic testing B-scan display showing detection of Type IV micro-cracks using shear wave full matrix capture / total focusing method (FMC/TFM)

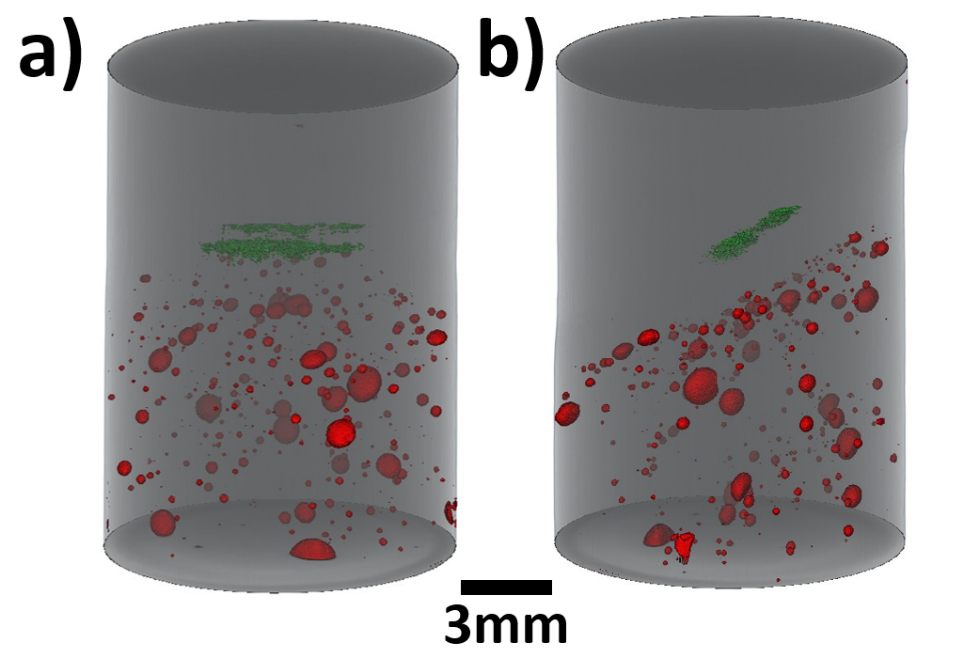
Renders of selected microstructural features imaged using microfocus X-ray computed tomography (µCT). Voids in the weld are shown in red; the creep damage is shown in green:
a) Front view from root side;
b) Side view showing the weld bevel angle and the gap between the weld metal (containing voids) and the fine-grained heat-affected zone containing the creep damage.
