Investigation of Integrated Additive Manufacturing from Feedstock to Part Quality: Development of WAAM process to achieve consistent bead geometry with conventional feedstock composition
TWI Industrial Member Report 1182-2024 [pdf / 8,652KB]
By Cui Er Seow PhD, MEng, MWeldI Kai Yang
PhD, MEng, MWeldI Ruth Donnelly PhD, MSci, MA, CEng, MWeldI andPhilippa Moore
PhD, MSci, MA, CEng, MWeldI
Industrial Need
With its high deposition rates and large build envelope, Directed Energy Deposition with Arc, known as Wire and Arc Additive Manufacturing (WAAM), has gained significant interest in various industries. Due to the complex thermal characteristics of WAAM builds, the use of conventional welding wire and fixed process inputs can sometimes result in unfavourable deposition conditions, leading to inconsistencies in the deposited bead geometry and microstructure (Tomar et al, 2022). These inconsistencies can result in excessive scatter in mechanical properties, which hinders part qualification and limits the use of WAAM parts in safety critical applications. Further, the geometry of the individual weld bead plays a critical role in the determination of the surface quality and dimensional accuracy of the deposited parts (Wang et al, 2021). Therefore, there is a need to improve the robustness of the WAAM process by means of developing a fundamental understanding of process factors that influence deposition conditions, as well as monitoring and analysis techniques to assess surface quality and dimensional accuracy.
This cross-cutting CRP project combines TWI’s expertise in microstructural analysis, non-destructive testing (NDT) and arc welding engineering, to develop a constant output approach to WAAM deposition. This involves identification of critical deposition parameters that control weld bead geometry and microstructure for a variety of build geometries. In parallel, conventional NDT techniques have been adapted to monitor WAAM deposition, from which key information can be extracted for feedback control. In addition, this project has also drawn on a catalogue of over 1500 samples of multi-pass butt welds with varying levels of 16 different alloying elements, to identify the relationships between alloying elements and reheated microstructures.
Key Findings
- Critical deposition parameters for CMT were identified, and the parameter set was demonstrated to achieve stable deposition up to 200mm build height in single-pass, multi-layer wall depositions
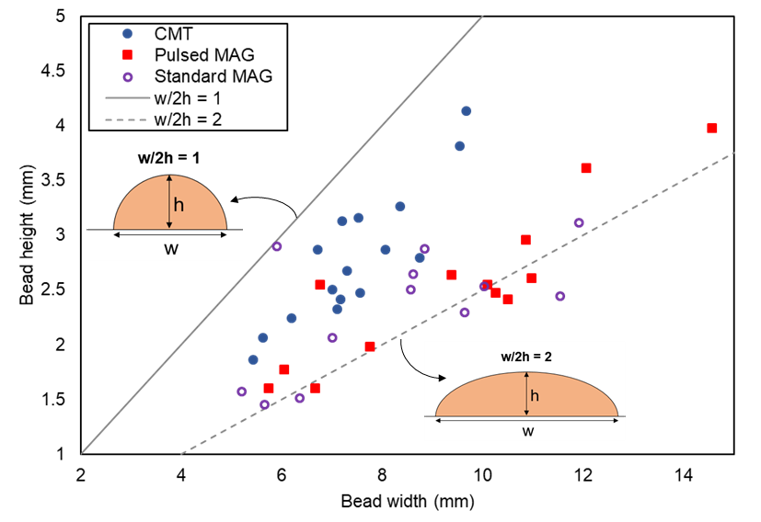
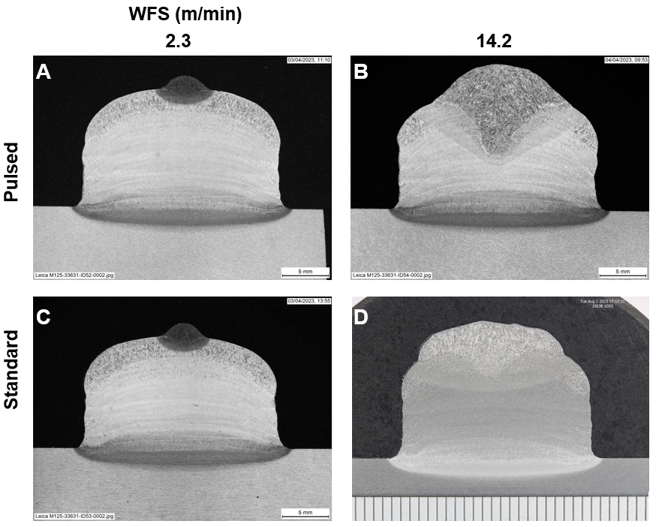
- The key process factors influencing bead geometry (ie bead width, bead height and penetration depth) were identified using novel single-pass, single-layer bead-on-pad experiments. The process mode, arc energy, arc correction, WFS and TS were found to have an observable effect on bead width, height and penetration depth.
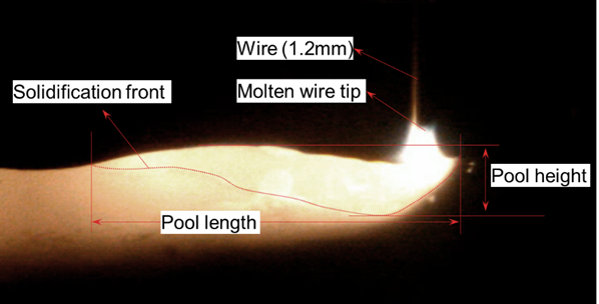
- A method of monitoring the WAAM process during deposition was successfully demonstrated via vision camera melt pool imaging. It was found that at least two camera angles are required to obtain bead width, length and height information of the melt pool. Arc flashes due to the nature of the MIG/MAG process resulted in loss of information as the view of the melt pool was obstructed.
- A Python-based prototype software was developed to analyse the melt pool images and measure melt pool size. The script distinguishes between images obstructed by the arc flash and non-obstructed melt pool images to prevent false readings.
Impact
The WAAM process via CMT was demonstrated to be stable for carbon steel using commercially available synergic line and control methods. Further, physical samples and measurement were generated and used to develop an understanding of process factors that influence deposition conditions. A vision camera melt pool imaging and python-based analysis and monitoring method has been developed.

Plot of bead height vs bead width

Melt pool image from Xiris welding camera

Macros of bead-on-pad trials showing effect of wire feed speed on bead geometry